How to Install Cable Railing for Your Deck or Balcony Like a Pro
Installing cable railing for decks and balconies is not only a stylish choice but also a practical one. With an increasing demand for modern outdoor spaces, the cable railing market is projected to grow significantly. According to a report from Grand View Research, the global cable railing market was valued at approximately $150 million in 2021 and is expected to expand at a CAGR of over 7% from 2022 to 2030. This trend reflects a shift towards open, unobstructed views while ensuring safety in residential and commercial applications.
Cable railing systems offer numerous advantages, including their durability and minimal maintenance requirements. In addition, they provide enhanced visibility compared to traditional wooden or wrought iron railings, allowing homeowners to enjoy their surroundings more fully. A survey conducted by the American Institute of Architects highlights that over 60% of architects believe that cable railings are becoming increasingly popular for outdoor spaces, indicating a strong inclination towards more contemporary designs.
In this guide, we will walk you through the step-by-step process of installing cable railing like a professional. With the right tools and techniques, you can achieve a clean, modern look that integrates seamlessly with your deck or balcony, adding value to your home while ensuring safety. Whether you are a seasoned DIY enthusiast or a novice, learning how to install cable railing will elevate your outdoor experience.

Choosing the Right Cable Railing System for Your Project
When it comes to choosing the right cable railing system for your deck or balcony, the options can seem overwhelming. According to a recent report by the Home Improvement Research Institute, cable railings have seen a significant rise in popular demand, thanks in part to their modern aesthetic and safety features. Homeowners are increasingly drawn to the unobstructed views that cable railings provide while ensuring compliance with building codes, which often require railings to be at least 36 inches tall. Choosing a system that meets these standards while also matching your design preferences is crucial.
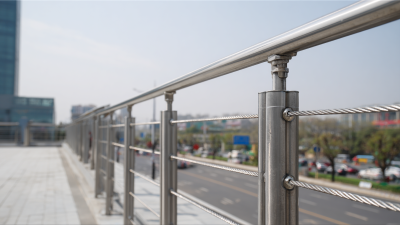
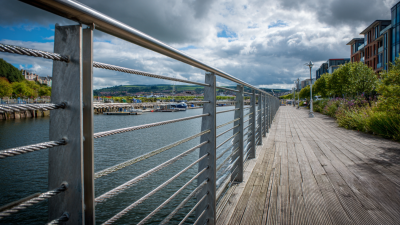
Tips: Before making a decision, consider the material of the cable railing system. Stainless steel is usually recommended for its durability and resistance to corrosion, making it ideal for various climates. Additionally, the spacing between the cables is essential—the typical maximum spacing is 3 inches to prevent children or pets from slipping through, in line with safety guidelines set forth by the International Code Council.
Another factor to consider is the type of posts used in the system. Many homeowners opt for posts that can complement their deck’s existing features, whether that’s wood, aluminum, or composite materials. A well-designed post can significantly enhance not just the functionality but also the aesthetics of your outdoor space. Data from the National Association of Home Builders indicates that investing in quality railing systems can increase property value and appeal, making it a smart choice for any renovation project.
Gathering Necessary Tools and Materials for Installation
Before you embark on the journey of installing cable railing for your deck or balcony, it's crucial to gather all the necessary tools and materials. The key tools you'll need include a level, measuring tape, a drill, and a cable cutter. Additionally, be sure to have on hand a tensioning tool for securing the cables properly. As for materials, you will require stainless steel cables, posts, and fittings that will withstand the elements and provide lasting durability.
Tips: When selecting materials, opt for high-quality stainless steel to ensure longevity and resistance to corrosion. Also, consider the finish of your posts and fittings—powder-coated options can enhance aesthetic appeal while offering extra protection against rust and wear.
As you prepare for installation, make a checklist of everything you need. This will help you avoid unnecessary trips to the hardware store. Always double-check your measurements before cutting your cables to prevent waste. If you can, enlist a friend to assist with the installation process; having an extra pair of hands can help ensure that everything is aligned correctly and securely fastened.
How to Install Cable Railing for Your Deck or Balcony Like a Pro - Gathering Necessary Tools and Materials for Installation
| Tool/Material |
Quantity Needed |
Purpose |
| Cable Railing Kit |
1 kit |
To provide the main railing structure |
| Post Install Tool |
1 |
For mounting posts securely |
| Drill |
1 |
To create holes for installation |
| Cable Cutter |
1 |
To cut cables to length |
| Level |
1 |
To ensure that posts are vertically aligned |
| Measuring Tape |
1 |
For accurate measurements during installation |
| Safety Goggles |
1 pair |
To protect your eyes while working |
Step-by-Step Guide to Preparing Your Deck or Balcony
When preparing your deck or balcony for a cable railing installation, it's essential to start with a solid foundation. According to the International Code Council (ICC), ensuring that your deck structure meets safety standards is crucial for supporting both the railing system and the users. Conduct a thorough inspection of your deck’s frame, ensuring that the posts are securely anchored and in good condition. This not only enhances durability but also addresses any safety concerns that may arise during and after installation.
Tip: Always measure twice and cut once. Accurate measurements are vital for a successful cable railing installation. The height and spacing of the posts must comply with local building codes. Typically, railings should be at least 36 inches high in residential areas. Adjust your plans according to these guidelines to avoid costly errors and ensure a professional finish.
Once you've confirmed that your deck is in optimal condition, clean the area thoroughly before starting the installation. Remove any debris, old paint, or hardware to create a seamless base for your new railing. According to the American Society of Home Inspectors, neglecting proper preparation can lead to installation issues that compromise safety and longevity. Consequently, investing time in cleaning and preparing your deck will save you headaches in the long run.
Tip: Utilize a level to double-check the alignment of your posts during installation. A level ensures that each component is straight, which not only contributes to the aesthetic quality but also the structural integrity of your railing system.
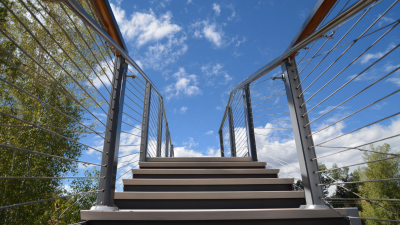
Installing the Posts and Tensioning the Cables Properly
Installing the posts and tensioning the cables properly is essential for a safe and sturdy cable railing system on your deck or balcony. Begin by determining the appropriate spacing for your posts, typically around 4 feet apart, to ensure maximum stability. Securely anchor the posts to the deck or balcony with concrete footings or post anchors, and double-check their vertical alignment using a level. It's crucial to allow for a slight slope in the railing to facilitate water drainage, preventing moisture buildup and potential damage.
Tips: Before finalizing the post installation, mark the cable entry and exit points precisely. This will help you maintain an equal tension across all cables, which is vital for both aesthetics and safety. Use a tension gauge to monitor the tension levels, ensuring that each cable is neither too loose nor too tight. If you're working with multiple cables, consider installing them one at a time to manage the tension effectively without losing track of the setup.
Once the posts are secured, begin threading the cables through the designated holes or brackets. Employ a proper tensioning technique, starting from one end of the railing and moving systematically to the other. Use a cable cutter and swaging tool to create clean cuts and secure fittings. Always ensure you check for proper tension after all cables are installed, making adjustments as needed to achieve a uniform look and feel. Properly tensioned cables not only enhance the visual appeal but also ensure the safety and durability of your railing system.
Final Adjustments and Maintenance Tips for Cable Railings
Maintaining cable railings is essential for preserving both their aesthetic appeal and structural integrity. According to a report by the American Association of Railings, regular inspections can significantly reduce the risk of long-term damage and are recommended twice a year, especially in regions with harsh weather conditions. During these inspections, check for any signs of rust, wear in the cable strands, or loose fittings. Tightening any loose fastenings not only helps maintain safety but also extends the lifespan of the rails, as poorly secured cables can lead to premature failure.
Furthermore, keeping the cables clean is crucial. A study conducted by the National Association of Home Builders suggests that debris accumulation can lead to corrosion, especially in coastal areas where saltwater is prevalent. Using a non-abrasive cleaner and a soft brush can help you maintain their shine without damaging the finish. Additionally, reapplying a protective sealant every few years can enhance resistance against environmental elements, ensuring that your cable railings remain not only functional but also visually appealing for years to come.
Monthly Maintenance Tips for Cable Railing