How to Choose Cable Railing Hardware in 2026?
Choosing cable railing hardware in 2026 requires more than matching stainless-steel fittings to a modern view. It requires evidence. Grand View Research continues to identify architectural metalwork and railing systems as growth areas, driven by renovation, outdoor living, and commercial construction. MarketsandMarkets also reports rising demand for modular, corrosion-resistant building components. These trends matter, but market growth does not guarantee a safe installation.
Cable diameter, post spacing, terminal strength, and corrosion resistance must work together. A sleek fitting can still fail when tension changes during temperature swings. Coastal air adds another concern. So does hidden moisture inside a drilled post. The International Building Code and local amendments should guide final decisions, while manufacturer test data should support them. A product page alone is not enough.
Mark Knauss, a longtime cable-railing specialist associated with Feeney, offers a useful principle: “The best railing system disappears into the view, but never disappears from the inspection checklist.” That idea shapes this guide. Select hardware by load performance, not appearance alone. Compare 316 stainless steel with 304 stainless steel when exposure is severe. Check swage tools, tensioners, washers, and replacement access before purchasing.
Small details decide long-term results. A cable may look perfectly straight today, then loosen after seasonal movement. That possibility deserves attention. This guide examines hardware compatibility, code awareness, installation experience, maintenance demands, and total cost. Some recommendations remain judgment calls. Real projects rarely behave as neatly as catalogs suggest.
Define 2026 Cable Railing Needs: Height, Span, Load, and Exposure
How to Choose Cable Railing Hardware in 2026?
Start by defining the railing’s actual height and span. Measure from the finished walking surface, not the rough deck frame. Stair rails require different measurements and careful cable alignment. Local building requirements can change by location, so verify current guard height and opening limits before ordering hardware. A small height error can force expensive field changes.
Span determines post spacing, cable deflection, and tensioning needs. Long uninterrupted runs often need intermediate posts to keep cables firm and openings consistent. Record every corner, slope, and termination point. Cable loads also matter. The top rail must resist expected leaning and impact forces, while each fitting must hold tension without damaging the cable. An engineer should review unusual balconies, elevated decks, or public-use areas.
Exposure shapes material selection. Coastal air, pool chemicals, winter salt, and trapped moisture can quickly reveal weak material choices. Use corrosion-resistant components with compatible metals, and prevent water from sitting inside fittings. I have seen clean-looking installations develop stains where drainage was ignored. That mistake is easy to repeat. Create a small sample section before full installation, then inspect cable alignment, tension, and finish after temperature changes. Hardware that performs well in a dry workshop may behave differently beside a wet, windy shoreline.
Match Cable Diameter and 316 Stainless Steel to Coastal Corrosion Risks
How to Choose Cable Railing Hardware in 2026?
Along the coast, cable diameter and stainless steel grade must be selected together. A larger cable is not automatically safer. It must match the posts, terminals, tensioners, and drilling dimensions. For many residential systems, 1/8-inch cable offers a clean appearance. Heavier 3/16-inch cable may suit longer spans or higher loading demands. Always verify the manufacturer’s tested compatibility.
Use 316 stainless steel where salt spray, humidity, and wind-driven moisture are common. Its molybdenum content improves resistance to chloride corrosion compared with 304 stainless steel. However, 316 is not corrosion-proof. Salt can collect inside swage fittings, threaded joints, and cable crossings. Those small pockets often show damage first. Keep dissimilar metals separated when possible, because galvanic corrosion can stain or weaken connections.
Inspect the railing after installation, especially near beaches, balconies, and exposed stairs. Look for tea-colored staining, rough cable surfaces, loose terminals, or water trapped around washers. Rinse salt deposits with fresh water and use cleaning methods approved for stainless steel. Avoid abrasive tools that scratch the passive surface. I have seen installers choose excellent cable but overlook drainage around the fittings. That mistake is easy to repeat. A slightly more expensive component may still fail when its geometry encourages trapped salt. Check the actual site, not only the product specification.
Select Posts, Terminals, and Tensioners for 200-lb Guard Loads
How to Choose Cable Railing Hardware in 2026?
A 200-pound guard load is not a rating you can assign to one cable or fitting alone. The posts, terminals, tensioners, fasteners, and supporting structure work as a system. Check the project’s applicable building requirements and the hardware manufacturer’s published test data. Requirements can vary by location and installation type. Small detail, big consequence.
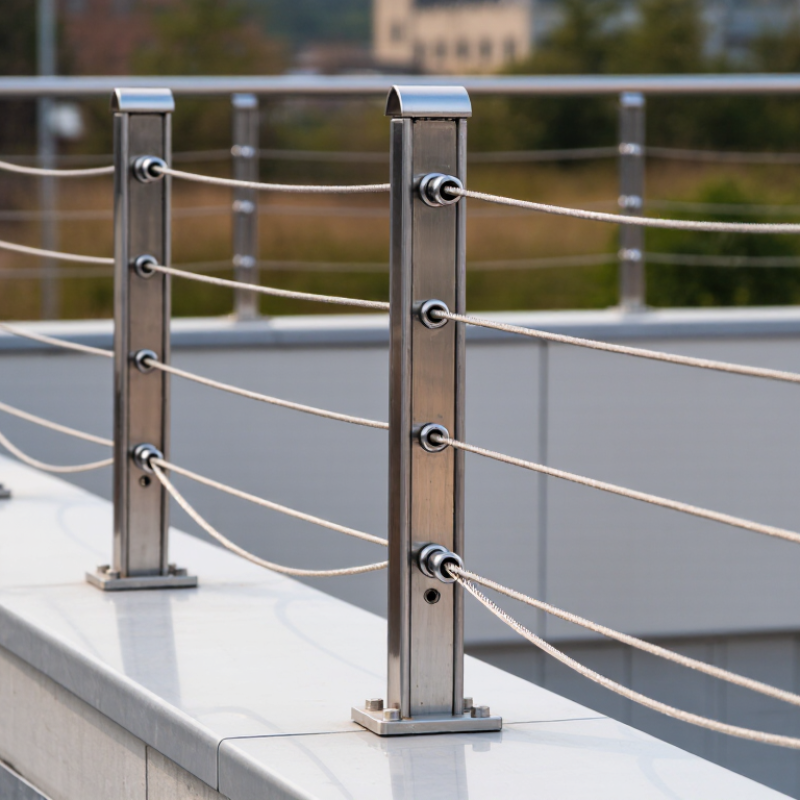
Choose posts with enough stiffness to limit deflection when cables are tensioned and when a person leans against the guard. Wood posts may need substantial blocking; metal posts need suitable wall thickness and secure connections. Select terminals and tensioners rated for the cable diameter and compatible with the post material. Look for clear installation instructions, corrosion guidance, and documented load testing—not just a large load number on a product page.
At installation, keep cable spacing consistent and use the specified end distances and fasteners. A tension gauge can help, though it does not replace checking the complete assembly. Over-tensioning may bow posts or loosen connections over time. I have seen neat-looking runs hide weak backing. That deserves a second look. Inspect fittings after installation and periodically afterward, especially where rain, salt, or temperature changes can affect hardware.
How to Choose Cable Railing Hardware in 2026? — Select Posts, Terminals, and Tensioners for 200-lb Guard Loads
| Hardware Category | Component to Select | Recommended Baseline | Key Dimensions or Ratings | 200-lb Guard-Load Considerations | Verification Checklist |
|---|---|---|---|---|---|
| Posts and Structure | End posts | Use structural posts at every cable run termination, corner, stair transition, and change in direction. | Common cable diameter: 1/8 inch. Post thickness and section size must be engineered for the span, material, and anchorage. | The 200-lb concentrated guard load is primarily resisted by the top rail, posts, connections, and supporting structure—not by cable breaking strength alone. | Check post bending, base-plate or embedded connection, fasteners, substrate capacity, and load direction. |
| Intermediate posts | Place posts closely enough to control rail deflection and cable sag; use a shorter spacing where the rail is flexible or the run is exposed to heavy use. | A practical starting layout is approximately 4 ft on center or less; final spacing depends on the engineered rail and post system. | Intermediate posts should provide continuous cable support or controlled cable pass-throughs without sharp edges. | Post spacing affects the horizontal load reaction and the amount of deflection transferred to the top rail and end posts. | Confirm the spacing with the post manufacturer's structural tables or a qualified design professional. |
| Corner and stair posts | Use dedicated structural posts wherever the cable changes direction, elevation, or plane. | Provide separate cable runs for major corners and stair sections instead of forcing one cable through a sharp directional change. | Use smooth, aligned holes or approved sleeves; avoid cable bend radii that can damage the strands. | Corner posts can receive cable tension from two directions and may experience greater combined reactions than line posts. | Check combined cable tension, post torsion, corner connection strength, and stair-angle compatibility. |
| Top rail | Select a continuous structural top rail capable of acting as the graspable guard member. | Use a rail with a smooth, graspable profile and secure it to every structural post. | Many building-code applications require a guard top rail to resist a 200-lb concentrated load at the applicable location and direction. | Do not treat a decorative cap or cable alone as the required top rail. The complete rail-and-post assembly must be checked. | Verify rail span, section properties, splice strength, post connection, and deflection limits required by the governing code. |
| Cable and Terminals | Cable | Use corrosion-resistant stranded cable intended for architectural railing applications. | Typical selection: 1/8-inch, 1x19 stainless-steel cable. A commonly published minimum breaking strength is about 1,760 lb, but values vary by alloy and construction. | Breaking strength is not the allowable design load. Apply the required safety factor, account for termination efficiency, and verify the complete system. | Confirm alloy, construction, diameter tolerance, minimum breaking strength, corrosion environment, and cable compatibility with the terminals. |
| Fixed terminal | Install a non-adjustable terminal at the fixed end of each cable run. | Choose a terminal designed specifically for the selected cable diameter and post-hole or through-post detail. | The terminal should have a published allowable working load or tested system capacity; do not size it only by outside diameter. | The terminal transfers cable tension into the post. Its anchorage, swage, thread, and bearing surfaces must resist the calculated tension. | Confirm termination efficiency, swaging procedure, thread engagement, washer or backing-plate requirements, and inspection method. |
| Adjustable terminal | Use a threaded or turnbuckle-style terminal at the tensioning end of each cable run. | Select a terminal with sufficient adjustment travel to compensate for installation tolerance and seasonal movement. | A useful planning allowance is approximately 1–2 inches of adjustment travel, subject to the selected system. | Adjustment travel must not be used to compensate for an undersized post, weak rail, or inadequate anchorage. | Check working-load rating, thread size, adjustment range, locknut or locking method, and access for future maintenance. |
| Washers, sleeves, and bushings | Use compatible washers, spacers, sleeves, and edge protection at cable penetrations. | Provide smooth bearing surfaces and prevent direct abrasion between cable, terminal, and post material. | Hole diameter and sleeve dimensions must match the terminal geometry while preventing excessive clearance. | Local crushing, pull-through, or galvanic corrosion can reduce the capacity of an otherwise adequate terminal connection. | Check material compatibility, edge radius, hole alignment, corrosion resistance, and pull-through resistance. |
| Tensioning and Layout | Tensioner quantity | Provide one tensioning point for each independent horizontal cable run. | Do not assume one tensioner can correctly tension multiple runs unless the system is specifically designed for that arrangement. | Separate runs make it easier to control cable tension, reduce cumulative movement, and maintain consistent infill spacing. | Identify every run by length, direction, elevation, terminal type, and tensioner location before ordering hardware. |
| Cable spacing | Lay out cables to maintain a code-compliant opening throughout the completed guard. | A common design target is a clear opening that does not permit a 4-inch sphere to pass, subject to local code and location-specific exceptions. | Spacing must account for cable diameter, deflection, post spacing, installation tolerances, and stair geometry. | The 4-inch opening rule is separate from the 200-lb guard-load requirement; both must be satisfied. | Check the finished opening with the applicable test sphere or measurement method after the cables are tensioned. |
| Initial cable tension | Follow the terminal or system-specific installation tension rather than selecting a value solely from the cable breaking strength. | Use a calibrated tension gauge or the approved installation procedure when a specified tension is required. | Target tension varies with cable length, post stiffness, temperature, terminal type, and system design; a universal tension value is not reliable. | Over-tensioning can increase post deflection, rail loading, base-connection forces, and risk of premature hardware damage. | Record installation tension, recheck after initial settling, and inspect for loose threads, cable deformation, or post movement. |
| Material and Installation | Corrosion resistance | Match the cable, terminals, fasteners, posts, and washers to the exposure environment. | For exterior or coastal exposure, select corrosion-resistant materials and avoid incompatible metal combinations that can promote galvanic corrosion. | Corrosion can reduce cable area, terminal strength, thread engagement, and anchorage capacity over time. | Review salt exposure, water drainage, dissimilar-metal contact, finish durability, and maintenance access. |
| Fasteners and anchorage | Use structural fasteners suitable for the post material and supporting substrate. | Fastener diameter, embedment, edge distance, spacing, and substrate strength must be designed as an assembly. | The 200-lb load path must continue from the top rail through the posts and fasteners into the deck, framing, slab, or other supporting structure. | Decorative screws or unverified anchors should not be substituted for structurally rated connections. | Verify pull-out, shear, tension, concrete or wood capacity, installation torque, and minimum edge distances. |
| Installation and inspection | Install, tension, and inspect the complete system according to the approved design and hardware instructions. | Use properly formed terminations, aligned holes, locked adjustment hardware, and smooth cable transitions. | Inspect cable spacing, terminal seating, thread engagement, rail continuity, post plumbness, and connection tightness. | Load compliance applies to the completed guard assembly, not to an isolated cable, post, or terminal. | Have the final assembly reviewed against the governing building code and, where required, by a qualified design professional. |
Verify 4-Inch Opening Limits and 36-Inch Residential Guard Heights
When choosing cable railing hardware in 2026, begin with measurements, not a catalog photo. A clean design can still fail an opening test.
For residential guards, many jurisdictions use a 4-inch sphere limit. That number applies to openings between cables, posts, and nearby framing. Check the locally adopted building code before ordering parts. Rules can differ for stairs, ramps, balconies, and special-use properties. Never assume a residential label settles the question.
Guard height also needs careful verification. A 36-inch residential guard height is common in some areas, measured from the walking surface to the top rail. The measurement may change on stairs or where local amendments apply. Mark the finished deck surface first. Then account for post bases, top-rail thickness, and any surface slope. A small planning error can leave the completed guard short. That happened on a project I reviewed; the posts were correct, but finished pavers raised the walking surface.
Choose hardware that maintains tension without crushing the cable. Look for compatible cable diameter, adjustable terminals, solid post connections, and suitable corrosion resistance. Near salt air, drainage and material compatibility deserve extra attention. Tighten cables gradually from the center outward, then recheck spacing. Cables may relax after installation. This is easy to overlook. Use a 4-inch gauge or rigid test sphere during inspection, not only a tape measure. Photograph the measurements and keep the code reference with the installation record. A qualified local inspector should review unusual layouts, since hardware instructions cannot replace jurisdiction-specific approval.
Compare Hardware Systems by ASTM Testing, Code Compliance, and Maintenance
Choosing cable railing hardware in 2026 requires more than comparing stainless steel grades. Test evidence should come first. The 2024 International Residential Code requires guards to resist a 200-pound concentrated load and limits openings to prevent a 4-inch sphere from passing through. Local amendments may change these requirements. Always verify them with the authority having jurisdiction.
Look for reports tied to the complete assembly. ASTM E985-00(2019) addresses permanent metal railing systems, while ICC-ES acceptance criteria can support evaluation of guard and handrail assemblies. Neither document automatically approves every cable layout. The report should identify post spacing, cable diameter, end fittings, substrate, and tested loads. A certificate showing only the fitting is incomplete. That assumption can fail.
Maintenance evidence matters, too. Cable systems can lose tension after installation, especially when wood framing shrinks. Inspect terminations, threaded studs, washers, and post connections during the first few months. Then inspect them at least annually. In coastal or deicing-salt environments, rinse exposed hardware with fresh water and check for tea staining, pitting, or trapped moisture. ASTM A1023 covers steel wire rope and strand requirements, but installers still need a practical inspection schedule. I would also request torque or tension guidance, not just a load rating. Small details matter.
How to Choose Cable Railing Hardware in 2026
Compare common guard-height requirements for residential and commercial projects. These are general model-code benchmarks; confirm the adopted code and local amendments for your project.
Choosing hardware: Confirm that the complete railing system—not just individual fittings—meets applicable code loads and project requirements. ASTM test reports can help document performance, but do not by themselves establish code approval. Cable spacing and deflection must also satisfy applicable opening and safety requirements. Inspect cables, terminations, and fasteners periodically; follow the system manufacturer’s maintenance instructions, since no single inspection interval applies to every installation.
Reference context: typical IRC residential guards are at least 36 in. high; typical IBC guards are at least 42 in. high. Exceptions and adopted editions may vary. The 4 in. opening criterion shown is a common guard-infill limit, subject to code-specific exceptions.
Related Posts
-
How to Choose the Right Cable Railing Hardware for Your Project?
-
Top 10 Cable Railing Tips for a Stunning and Safe Deck or Balcony Design
-
Exploring Cable Railing Innovations at the 138th Canton Fair 2025 in China
-
Revolutionizing Safety: The Impact of Cable Handrail Systems on Modern Architecture
-
Why Cable Handrails Are the Future of Modern Stair Design: Safety Meets Aesthetics
-
Transforming Spaces: The Ultimate Guide to Cable Handrail System Designs and Installations